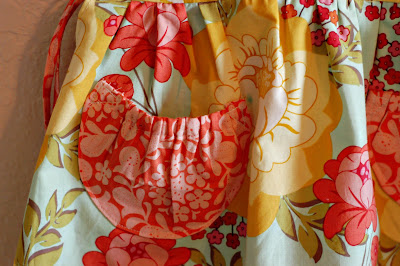
Ok, so I completed the Frida dress as said in earlier post and I am back as promised. It took me a bit longer than expected, but that could be due to the two screaming little ones I had! I just want to say...I LOVE THE WAY THE DRESS TURNED OUT...I'm so HAPPY!!!
I would say that the sizing is ver true to size. When I first saw the pieces cut out I was a bit worried, but after finishing the bodice and trying it on my daughter I was greatly suprised...it fit perfect. The bodice looks great with the perfect point in the middle. I chose the capped sleeves version which gives it a nice peasent look. I must say that the trickiest part of the whole dress for me was the ties. The piece of fabric you had to work with was tiny making it hard to manuver, but they still turned out GREAT, AND she gives you the option of using ribbon so this problem can be resolved. My favorite part of the pattern was how she had you sew the pockets on giving it a professional and practical touch! I also love the touch of the slit in the top of the skirt portion making more room in the sleeves. I give this pattern TWO THUMBS UP. Definitely for an intermediate sewer, however the directions are awesome so you beginner sewers feel free to give it a shot! This dress would also look great with some leggings and a long sleeve t-shirt underneath for these colder months we are having. In fact I think that I am going to make THESE to match and go underneath!! Thanks for looking.
EDITED:
**So I couldn't wait...I had to make some pants to match using the Katie Cupcake pattern. They were kind of a quickie-hack-job if I must say so, but still turned out cute and totally completes the outfit**
Saturday, February 5, 2011
{P52 and another new project}
Just wanted to do a quick post right now to show my P52 pics for the months of July and show you what I'm working on this BEAUTIFUL day for my darling daughter :)
{Week One-Caleb's first haircut}
{Week Two-my fabric for a lap quilt}
{Week Three-Mackezie is FINALLY in Panties}
{Week Four-my little hoodlums}
...and for my new project for Mackenzie I am making this dress
with this fabric,
this fabric
and this fabric!!!
It's lookin' cute so far. Off to sew now!!!
Friday, February 4, 2011
{Old Navy Knock-Off}
Ok guys...so I posted earlier on my five finds friday about a skirt from Old Navy that I just LOVED. Well, I braved the ice and went to Jo Ann's Fabric, found some fabric almost identical to it and created a tutorial for you all! Yay...another tutorial.
{Super Twirl Skirt}
1. For this project you will need about 1-1 1/2 yards of fabric **my daughter wears a 5 and I needed 1 yard with nothing left to spare**. Measure your child's waist and subtract 1-2 inches from that measurement. This will be the length you will cut your elastic.
2. For the top of your skirt you will need to cut two pieces of fabric the width of your child's waist measurement by 12in. **mine was 20x12in...you can adjust according to your child's height** Place these two pieces right side together and sew along both of the short sides creating a tube. Press seams open and then fold this tube in half lengthwise so that the wrong sides are together and press along the fold.
3. Next you want to sew a casing at the top of this fold the width of your elastic plus a 1/4in **my elastic was 1 1/2in so I made a casing that was 1 3/4in**. Backstitch at the beginning and end and make sure that you leave an opening the width of your elastic so that you can thread it through your casing when you are done. After threading the elastic through, sew the ends of the elastic together using a zig zag stitch. Close up the opening you made for your elastic. You have now completed the top of your skirt.
4. Next you will want to measure on your child how long you want the skirt to be and subtract the width of your top piece from that then add two inches for your seam allowance and hem **I wanted my skirt to be 12in long and my top piece was 7in then I added two inches. 12-7+2=7...does that make sense??? All these measurements are making a CUSTOM FIT skirt for your child** The you want to sew wrong sides together the short ends of your fabric once again creating a BIG tube. Press seams open. Now we are going to gather the top of this piece of fabric. Set your stitch length as high as it will go and instead of sewing all the way around the fabric once, start at one side seam **leaving long tails of thread at beginning and end** to the other and repeat. Once this part is done take the top of your skirt place it inside your bottom piece **right sides together** and match up the side seams of the top piece to the side seams of your bottom piece and pin. Now you can gather your fabric so that it matches the width of your top piece. Spread out your gathers evenly and pin as your go.
5. Once eveything is pinned together you want to sew all the way around your skirt pieces using a 1/2in seam and making sure you catch all three pieces in your seam. When your are through serge your raw edges or zig zag stitch as close to the edge as you can. **this is to prevent the raw edges from fraying and your child catching their toes on all those little threads** Flip your skirt right side out and press the seam you have just sewn up. Topstitch all the way around your skirt. **this gives it the perfect touch**
6. Lastly you want to hem your skirt. I serged my raw edge then folded it up for a hem, but if you don't have a serger you can just create a double hem encasing the raw edge.
Viola!!! Your done!!! Looks almost identical to the one from Old Navy huh???
How was it?!?!? Confusing?!?! Please feel free to leave any comments with questions you may have or something that wasn't clear or completed projects from my tutorial. I encourage constructive criticism. Thanks for looking!!!
Subscribe to:
Posts (Atom)