Monday, July 18, 2011

{Waiting Game}

So I was officially on Maternity leave as of Saturday...and boy was this weekend busy...not busy enough for Logan to come on his "guess date", which was Saturday!!! Oh well...I'm sure it will be soon. I go back to see my midwife on Thursday, if I make it that long. Between now and then I guess I am just going to catch up on lost projects, take more pictures, do some cleaning/organizing all while trying to keep my extremely puffy feet elevated and relax...um...did I miss anything ;)
A few weeks ago I started Project Life and I absolutely *LOVE it* I would recommend it to anyone. It has been working great for me because all I have to do is print out some pictures, add some journaling and stick them in the page protectors. Digital scrapping has been SO TOUGH for me to keep up with, even though I still have been spending the money on all the new cute product! SO, project life was the PERFECT solution for me. I love that you can add little things here and there besides the traditional photos and journaling ie. invitations to a party, receipts, ticket stubs, etc. These are all things I normally keep, but end up throwing away cause I don't have anywhere to put them, plus it's hard to incorporate in a digi page. Ooh, I'm so excited!!! ALL of my photos so far that I have added to my album are printed from my iPhone, which is SO AWESOME because it's always with me. The quality is not the greatest, but hey...I am getting life documented and I am able to remember the simple things in life.
Here is a link to get you started on Project Life if you are interested or you can click the ad to the left!
The products that I purchased to get started are as follows because all of the Project Life 2011 Kits are SOLD OUT:


100 3x4 Journaling Cards by Becky Higgins

Divided Photo Pocket Pages-Design A by Becky Higgins

Divided Photo Pocket Pages-Design B by Becky Higgins

Apps I use on my iPhone photos:

Camera + ($1.99)

Instagram (free)

Hipstamatic ($1.99 + .99 add on's)

These are just a FEW things that are out there to purchase other than the kit...there are also endless possibilities of page protectors...as you can see all the ones I have purchased and there are still so many others.

Here are some things that I want and plan to get soon:


I guess this should be enough for you to think about right now...off to shopping you go...how about a little inspiration?!?!?!?
ps. I'm just a TAD behind, but ONLY because my computer has been acting up!


Tuesday, May 31, 2011

{Tutorial & Im a HORRIBLE BLOGGER}

So I must confess, not that its hard to figure out, but I am a HORRIBLE BLOGGER. I spend so much time reading other people's blogs that I don't keep up with my own! What my plan is to post more of the projects that I make and make some tutorials, but I either make things and give them away too quick that I don't get pictures, or I get so busy making something that I forget to take pictures. So with that being said I have a quick tute for ya!
I recently visited this blog and saw this great tutorial for an earring hanger...HERE is the original tutorial, bt I will show you some different tecniques and tricks that I found helpful!

First thing I did was start out with a frame. I purchased it from JoAnn's for $5...50% off! I guess that is a decent price for a frame. It's a pretty nice one anyways. I suppose that you could find an unfinished one from Hobby Lobby which would make things a little easier. Whatever your preference is. This frame originally was a solid brown. I sanded the edges so that the natural wood showed through and lightly sanded the rest of it so that the paint would stick. I then used a damp cloth to get all the dust off.


Let the frame dry completely. I then painted the front of the frame with an acrylic paint. The first coat will not cover the frame very evenly, but let it dry and apply a second coat which will looks ten times better. Don't worry about it looking too pretty though cause your going to again give the frame another sanding. Sand lightly the frame roughing/distressing it to your liking!


Now turn the frame over and make a mark at 2", 5" and 8" on either side of the "picture" opening (these would be measurements for an 8x10 frame holding the frame vertically). At your marks insert your thumb tacks just slightly into the wood so that there is still room to wrap the wire around it. I decided to use framing wire instead of the jewelry wire because it was a bit thicker and braided so that it would be a bit straighter as you pulled it across (plus I found it on clearence for 99 cents...yay). You then want to hammer the tacks into the wood the rest of the way. Because this wire was a bit thicker than the jewelry wire I decided to reinforce it by using a piece of super sticky tape over the thumb tack so they wouldn't come out after some use.
Voila...you're DONE!!! Doesn't it look perty?!?!?


I just recently purchased a Silhouette SD so I am going crazy with the projects...stay tuned to see what I make :D

Wednesday, March 30, 2011

{New Dress and Easter Egg Hunt}

This past weeken we went to the Annual Easter Egg Hunt on the Harris Farm! We all had a lot of fun as we normally do...it sure was a hot day though and you will see Caleb's face is beat red in some of the pictures. I also make Mackenzie a new dress every year for this occasion. This year I am making the dress available in {MY SHOP} available in sizes 12m-6years. I am also working on some more boy clothing items...it's just so much harder as you most know to either make/buy for boys...but it's coming...promise! {more pics to come}


Friday, March 18, 2011

{Five Finds Friday and New stuff}

Hello everyone...it's been a few weeks since I've posted. I have been SO SICK with an aweful sinus infection and FINALLY feeling better! In case you haven't checked it out lately go to {MY SHOP} and see all the new things I have added!!!


Ok now for the fun stuff...here are my {FIVE FINDS} for this week:


{Love Encounter Sketches} by Kitty Designs at O'Scraps-I had to get these to make a new Shutterfly book with. She does the BEST albums!!


{Aviator Hat} by Oops! I knit it Again-ths hat is ADORABLE...I think that I want to get it for the new little baby-boy-to-be!!!


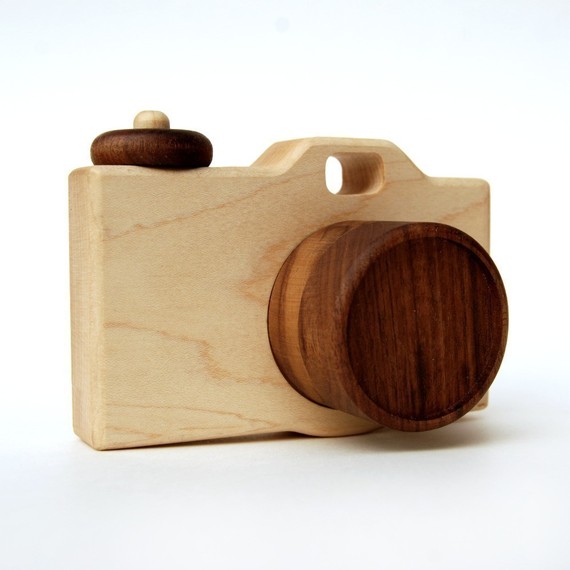
{Organic Camera Toy} by Little Sapling Toy's-coolest toy EVER!!!


{Chocolate Flap Cap} by Unmashin-this would look so cute on Mackenzie with her curls popping out!!!


{Lucky and Blessed Necklace} by Lisa Leonard-once this new baby is born I'll have to get a new necklace...this one is perfect!!!

Saturday, February 5, 2011

{Frida Dress Pattern Review}

Ok, so I completed the Frida dress as said in earlier post and I am back as promised. It took me a bit longer than expected, but that could be due to the two screaming little ones I had! I just want to say...I LOVE THE WAY THE DRESS TURNED OUT...I'm so HAPPY!!!
I would say that the sizing is ver true to size. When I first saw the pieces cut out I was a bit worried, but after finishing the bodice and trying it on my daughter I was greatly suprised...it fit perfect. The bodice looks great with the perfect point in the middle. I chose the capped sleeves version which gives it a nice peasent look. I must say that the trickiest part of the whole dress for me was the ties. The piece of fabric you had to work with was tiny making it hard to manuver, but they still turned out GREAT, AND she gives you the option of using ribbon so this problem can be resolved. My favorite part of the pattern was how she had you sew the pockets on giving it a professional and practical touch! I also love the touch of the slit in the top of the skirt portion making more room in the sleeves. I give this pattern TWO THUMBS UP. Definitely for an intermediate sewer, however the directions are awesome so you beginner sewers feel free to give it a shot! This dress would also look great with some leggings and a long sleeve t-shirt underneath for these colder months we are having. In fact I think that I am going to make THESE to match and go underneath!! Thanks for looking.


EDITED:
**So I couldn't wait...I had to make some pants to match using the Katie Cupcake pattern. They were kind of a quickie-hack-job if I must say so, but still turned out cute and totally completes the outfit**