Friday, February 4, 2011

{Old Navy Knock-Off}

Ok guys...so I posted earlier on my five finds friday about a skirt from Old Navy that I just LOVED. Well, I braved the ice and went to Jo Ann's Fabric, found some fabric almost identical to it and created a tutorial for you all! Yay...another tutorial.

{Super Twirl Skirt}
1. For this project you will need about 1-1 1/2 yards of fabric **my daughter wears a 5 and I needed 1 yard with nothing left to spare**. Measure your child's waist and subtract 1-2 inches from that measurement. This will be the length you will cut your elastic.


2. For the top of your skirt you will need to cut two pieces of fabric the width of your child's waist measurement by 12in. **mine was 20x12in...you can adjust according to your child's height** Place these two pieces right side together and sew along both of the short sides creating a tube. Press seams open and then fold this tube in half lengthwise so that the wrong sides are together and press along the fold.


3. Next you want to sew a casing at the top of this fold the width of your elastic plus a 1/4in **my elastic was 1 1/2in so I made a casing that was 1 3/4in**. Backstitch at the beginning and end and make sure that you leave an opening the width of your elastic so that you can thread it through your casing when you are done. After threading the elastic through, sew the ends of the elastic together using a zig zag stitch. Close up the opening you made for your elastic. You have now completed the top of your skirt.


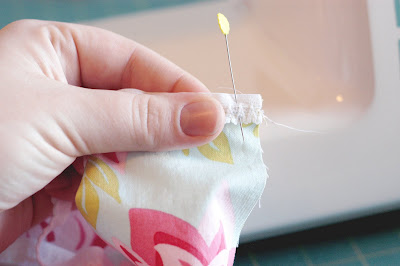
4. Next you will want to measure on your child how long you want the skirt to be and subtract the width of your top piece from that then add two inches for your seam allowance and hem **I wanted my skirt to be 12in long and my top piece was 7in then I added two inches. 12-7+2=7...does that make sense??? All these measurements are making a CUSTOM FIT skirt for your child** The you want to sew wrong sides together the short ends of your fabric once again creating a BIG tube. Press seams open. Now we are going to gather the top of this piece of fabric. Set your stitch length as high as it will go and instead of sewing all the way around the fabric once, start at one side seam **leaving long tails of thread at beginning and end** to the other and repeat. Once this part is done take the top of your skirt place it inside your bottom piece **right sides together** and match up the side seams of the top piece to the side seams of your bottom piece and pin. Now you can gather your fabric so that it matches the width of your top piece. Spread out your gathers evenly and pin as your go.


5. Once eveything is pinned together you want to sew all the way around your skirt pieces using a 1/2in seam and making sure you catch all three pieces in your seam. When your are through serge your raw edges or zig zag stitch as close to the edge as you can. **this is to prevent the raw edges from fraying and your child catching their toes on all those little threads** Flip your skirt right side out and press the seam you have just sewn up. Topstitch all the way around your skirt. **this gives it the perfect touch**


6. Lastly you want to hem your skirt. I serged my raw edge then folded it up for a hem, but if you don't have a serger you can just create a double hem encasing the raw edge.


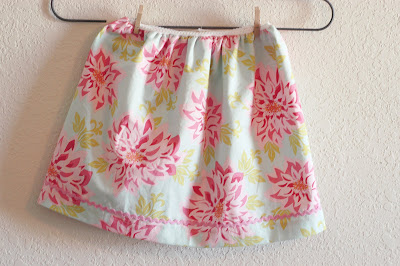
Viola!!! Your done!!! Looks almost identical to the one from Old Navy huh???


How was it?!?!? Confusing?!?! Please feel free to leave any comments with questions you may have or something that wasn't clear or completed projects from my tutorial. I encourage constructive criticism. Thanks for looking!!!

{Five Finds Friday}

Hello again...it's friday and it's a bit wet, cold and icy around my parts. The roads are a mess here 'cause Texas is not prepared for ice and snow :) I LOVE IT though! Anyways...just a quick post for my five finds:

1. Paint the Moon's new "Blessings" and "Moxie" photoshop actions...I couldn't get a picture to post but click on the link and it will take you to it! Trust me...click on the link...they are BEAUTIFUL!!!

2. Stand Tall Alpha from CD Mukowsky


3. Fuji Instax Mini Camera...it prints photos like a Polaroid used too...looks like fun!


4. Plaid Patchwork Skirt for Girls from Old Navy...fell in love with this skirt. I think that I will try and replicate it somehow (will post on that later :)


5. The Vintage Love Charm Neclace from The Vintage Pearl...BEAUTIFUL!!!


Thanks for looking and I hope you enjoy this eye candy as much as I did. I hope to have a few more posts this weekend so stay tuned. Better yet...add me to your Google Reader (sidebar to the left) so you don't miss a lick!

Wednesday, January 26, 2011

{Simple Skirt Tutorial}

Ok everyone...I must warn you up front that this is my first tutorial ever so I apologize if it is unclear in any way. Please leave a comment if you have any questions. Here goes nothing!!!

1. You want to first measure your child's waist and from that measurement subtract 2 and this is going to be what you cut the length of your elastic to. (ie. mine measured 21 so I cut the elastic to 19 inches)


2. I then cut my fabric according to the length of the skirt I desired. I figured 15 inches would be good enough after it was hemmed and all. I left the fabric width the same just cut off the selvages. Normally you would want to cut your fabric twice the measurement of your child's waist (ie. 21 x 2 = 42 which is normally what the width of your fabric is anyways) If you are making this for an older child you probably will want to divide your skirt into two pieces instead of one continuous piece. Make sense???


3. Next you will want to serge your top and bottom edges...if you don't have a serger...like me...continue reading or if your machine has a stitch like it may have a stitch VERY similar to a serger's stitch.


4. Once your edges are ready you will want to hem the bottom edge of your fabric. I made a one inch hem. Because you serged your bottom edge you only have to hem once. If you don't have the serger you can always to the double hem to enclose your raw edge. When you are done ironing your hem top stitch along the serged edge. Looking good isn't it?!?!?


5. At this point you can embellish the bottom of your skit with some ric rac or ribbon to give it a little more character.


6. The next part is the best as you will see you project coming together. Take your piece of elastic you cut and pin it to the top serged edge of your skirt piece. I used about five pins to evenly distribute the skirt along the elastic. This is important that you evenly distribute the fabric along the elastic.


7. You now are going to sew the elastic to the top of your skirt. I used a 1/8" seam. Back stitch at the beginning and end. As you sew you will want to pull the fabric and elasetic in each section you pinned so that they are both flush with each other. This is what is going to give you your gathered look to the shirt without actually having to gather it! Take it slow each section at a time until you get to the end. We are almost there!!!


8. Last step...you now want to put the raw edges of the skirt pieces together and sew together using a 1/2" seam. I serged that raw edge too just so that it won't fray. You can zig zag stitch the edge if you don't have a serger. When you are through press the seam to one side and VIOLA!!! You are done...now wasn't the SUPER EASY?!?!?


What do you think? Please leave me some comments on either questions or comments on how you liked the tutorial...constructive criticism please :)
Thanks for reading!!!

Saturday, January 15, 2011

{Denim Britches}

I made Caleb some denim britches today (used THIS pattern). I must say I am not too happy with the way they turned out. I think that I will make another pair of them...maybe one without a cuff and definately a size bigger. They are a bit snug on Caleb...what do you think???


Friday, January 14, 2011

{Five Finds Friday}

Today I have been online window shopping and have found so many cute things that I just had to share:


STINKIN CUTE BUNDLE


1 CANOE'S 2 RECIPE BOX


BARE MINEARLS BUXOM SMOKEY EYES


{SECRET}LOVE MESSAGE CUFF BY VINTAGE PEARL
I would take this one for Valentines Day!


SILVER RING FROM SILVER MADE STUDIO

Sunday, January 9, 2011

{Welcome to 2011}

Hello everyone...and welcome to 2011! I am back :) Gosh it has been FOREVER since I have posted anything. I am going to have to work on some updates to put on here, but for now I will keep it short and sweet and tell you that everyone is doing well and happy in this new year. I hope everyone had a great Christmas and New Year. I had a GREAT Christmas, but the new year on the other hand was not so great as I spent it ALL at work...no fun :( I encourage everyone who reads this to leave me a comment and tell me something that you plan to do this year. My plan for the year is to get organized and work HARD on growing my business! Here are a few photos of my little ones to leave you and I will see you all soon...PROMISE!!!

Caleb's first haircut


Yummy First Birthday Cake


Blowing out the Candles


She LOVES TOY STORY